Buying a camera is hard. There are a load of nearly identical models and so much comes down to personal preference at a time when one doesn't know enough to have a preference. Given how expensive lenses can be, this is also a decision about which ecosystem to buy in to. It's a similar lock-in to the Apple / Windows or iOS / Android world in that it's reversible, but change can be tricky, unfamiliar and expensive. I may write about this in the future, but for the moment my key learning was the big choice if buying an SLR is Nikon / Canon. I ended up choosing a Nikon 5600.
Not all the way off auto
I've played around with manual photography before and have a (very) basic understanding of what the various settings do. When switching to manual mode on the phones I've used, the interface has encouraged taking full control - that is handling aperture, shutter speed, ISO and white balance all at once. This has always been too many interconnected, unfamiliar settings to learn and embrace at the same time. Possibly the single most useful tip from this course was to view it differently - take control of one of these aspects and let the camera do most of the rest automatically. This gives priority to a particular setting and therefore set of techniques (indeed, the modes on a proper camera are called aperture or shutter priority so ... yeah).
Aperture
We focused on aperture, letting the camera adjust shutter speed automatically and making corrections for exposure with the ISO setting. A wider aperture (aka a smaller f stop setting) lets in more light, allowing a faster shutter speed. It also allows control of the depth of field, enabling the blurred background effect used to create useful negative space and draw attention to a specific area of a picture.
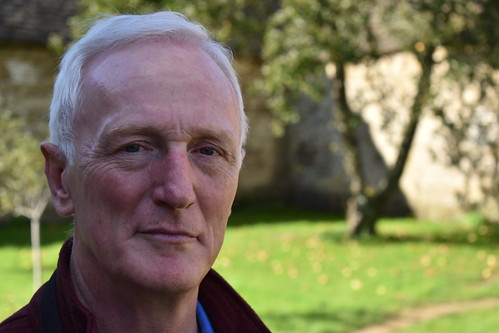
This is often seen in portraits. Some useful tips for portraits - the eyes are the most important bit and should therefore be in the sharpest focus. So far, fairly obvious. Less obvious is that the camera may well actually focus on the closest part of the face - the tip of the nose - so for a really good picture some manual adjustment is necessary.
Another counter-intuitive tip is that portrait pictures are best taken on maximum zoom or with a dedicated telephoto lens. This is because the longer focal length allows for a wider aperture and hence maximises the depth of field effect.
Results?
And lo, the results.
Or, for a particular example of the portrait stuff above:
We had a lot of fun walking around Lacock and practising the specific techniques that fell out of playing with this one setting and the day did a wonderful job of demystifying the bewildering array of buttons on a decent camera. I'm looking forward to learning more.
2 comments:
Gosh, the 5600! I went for the 3300 as my first one :)
The biggest predictable surprise for me was that once I did have a telephoto lens just how damn heavy it is and is therefore completely useless for video unless you have a tripod (which I now have).
Good luck Tom! If you're interested TOP (http://theonlinephotographer.typepad.com/the_online_photographer/blog_index.html) is great for stuff about actual pictures rather than technical nerdery, but if/when you do need something on the more technical side Thom Hogan is the Nikon authority (http://www.bythom.com/)
Post a Comment