Showing posts with label computer. Show all posts

Sunday, 23 February 2025

Email Three - Email with a Vengeance

"You email isn't arriving at all now" - everyone.

I have spent far too long writing about email and how to set up vanity domains. This really should be easy and Just Work but ... well. Here is the third post. Why do I care? Well, given how important email is as part of our online identities I do believe in taking some ownership of it, hence using a vanity domain. By using my own domain instead of an @gmail.com address I could migrate away from Gmail in the future without losing access to everything in the world. While I don't intend to go anywhere any time soon, Google does have a habit of doing odd things with its services so I'd like to have some options (he says, using Blogger which is far more at risk than Gmail...).

With that in mind, I'd like to use a vanity domain. I'd also like my email to arrive. And I'd like people to be able to email me too. High requirements, I know.

The story so far

So this is the third post on this subject (sigh). In my first post I went into detail on my requirements and the underpinning bits of security apparatus required to make email happen. I set things up using SendGrid but lamented using a marketing company for email as well as a cap on my daily email usage.

In my second post I removed SendGrid as sending / receiving wasn't consistent and switched to using the Gmail mailservers. This removed the restrictions but also made it impossible to set up DKIM and DMARC properly. I helped my setup by setting p=none which is better than nothing, but not by a lot.

Guess what? Email didn't send / receive again. This appears to have gotten worse recently, or I'm noticing it more. When three email vanished over a couple of days I cracked - I can't live with inconsistent email. It's too important.

The problem

Reading around suggests that the problem is to do with how email forwarding works. No-frills forwarding essentially throws the email at the receiving server. The receiving server then figures out what to do with it. This is fine, until one factors in load - and that all spam needs forwarding in case of false positives. The system needs to decide what to do when it is overloaded, and it seems the Gmail servers drop email in this case. Then the forwarding service needs to decide what to do and the simplest approach is to also drop the email - else they are then storing email which has its own overheads and problems.

This is a crude explanation - here is an expert explaining it far more accurately.

Considering I've been using free options, I can see why they've taken this approach but it's not good enough for me.

The solution

The solution is to use something which holds incoming email temporarily and retries if the forwarding fails. There are a few ways to do this, including some approaches using scripting and free services but as noted above I'm really bored of fiddling with this ecosystem then gaslighting myself into thinking it's working when there are a few, but notable, errors. No scripts, time for something a bit more thorough.

Enter Gmailify. Apparently Tim O'Neill suggested this to me the first time around, but either I didn't note it or I got confused with the Google feature of exactly the same name. Either way, I am now giving it a go and the pricetag ($7 / year at time of writing) is very reasonable.

Gmailify works as a forwarding / mailbox service. It controls the incoming / outgoing mail on your domain and temporarily lets the email rest in a mailbox. Gmail then uses POP3 to pull from that mailbox which then erases all trace. It also enables all the DKIM / SPF / DMARC setup that was missing before.

Setup is really straightforward if you know how to edit DNS settings and tbh should be easy if you're just confident clicking around. It gives you exactly what you need at each step, and an option to verify each step has gone in properly. The interface for routing different addresses on your domain is really easy to use too, at least for a simple setup.

Couple of things that took me a moment of thought. First, you need to set up the primary email address then configure the catch-all email address if you're used to *@domain.com. This is easy in the Email Routing submenu. Second, Gmail doesn't automatically prompt for outgoing email any more (could be because I was migrating a config?) and when modifying an existing outgoing mail rule it doesn't perform a full validation which will likely create problems down the line. I got around this by deleting my existing outgoing mail rule and setting up from scratch again. Don't forget to reset your default outgoing email address if you do this!

Oh, and if you're migrating rather than setting this up for the first time don't forget to clean up your DNS config when you're done.

All done in less time than it took me to type this up. I sent some email to Tim's overly-fussy email account and it all got through which is a first. I also ran it through this awesome tool for learning and testing DMARC settings which is worth a play if only to see how education tools should be designed. All the tests now light up a pleasing green - another first.

I've had this set up a few days so I'm keeping my fingers crossed this is the last time I have to write about this...

Tuesday, 19 November 2024

Resurrecting a Pixel C

I'm putting off the post I need to write so I'm going to ramble a bit about resurrecting an old Pixel C tablet by sideloading a custom operating system. This is something that sounds scary but really isn't, so I thought I'd share in case anyone else has hardware in the cupboard and no desire to buy new, expensive kit.

Setting the scene

My tablet usage is pretty modest. For anything significant, I'll use a laptop / desktop or my mobile phone. My tablet is mostly used for video streaming (YouTube, Netflix, etc) and a bit of web browsing when it's the closest thing to hand. I am not a power user.

Many years ago (2016), I bought a Google Pixel C tablet. This was originally released in 2015 and was Google's first tablet under the Pixel brand. Other than having a name that is really annoying to search for, it was a fabulous piece of kit - feeling very solid and chunky. However for boring reasons, when COVID hit I moved and my Pixel C fell out of use.

Fast forward many years, and my iPad battery is dying so I thought I'd see about resurrecting the Pixel. Firstly, I hadn't realised how long it had been since it was last used - like a lot of people I know, my sense of time has been utterly smashed by two years of lockdown - so it was a bit of a surprise to discover Google stopped supporting it nearly six years ago (end of 2018). Consequently, although it fired up fine, it was hideously out of date with no path to catching up. It seems older versions of Android (8 in this case) have a problem connecting to modern 5ghz wifi connections and so my lovely hardware was dead unless I wanted to run a lower speed wifi network.

Why take the easy solution, eh?

So, with my brain telling me "this is only a few years old" (it's nine years old?!) I thought I'd look at bringing it back to life via the medium of a custom ROM. For the uninitiated, this is basically installing a new operating system package - pre-built with proper drives and so on - however is more complicated because tablets and phones tend to lock all this down to stop people fiddling and bricking the device. However, I'm (apparently) a grown adult so I'll fiddle if I damn well please. Plus, it doesn't work now so it's not going to get any less functional - perfect for some learning.

Get on with it

The hard part was really all the prep. I needed to find a good ROM, which I did via the application of Google and reading. LineageOS is a the gold standard for community-run operating systems, but even they have dropped support for the Pixel C. However there are some intrepid folk out there who are keeping the dream alive on the XDA forums and a helpful dev going by npjohnson is pushing out builds for the Sphynx project, via his forum thread. Sphynx is an unofficial build of LineageOS tailored for the Pixel C - perfect for me.

The instructions are good - I read them a few times before giving this a go because I was scared - and basically there are four stages:

  1. Download adb and fastboot to your computer - this laptop is Ubuntu Linux so that was as simple as sudo apt install adb fastboot but Windows options are also available
  2. Learn how to boot your tablet into the recover mode menu (for the Pixel C, with the device off hold Power and Volume Down)
  3. Download the desired image - I just took the latest (lineage-21.0-20241019-UNOFFICIAL-sphynx.zip at the time) and it worked fine
  4. Follow the instructions very closely

Extremely minor gotcha - I extracted the downloaded zip file to get a recovery.img file for page 3, then used the original zip for sideloading in step 4. Other than a couple of slightly alarming beeping sounds from the device, this was the only time I really needed to think once I got going. The whole process took about an hour, going very slowly and carefully, then additional time to set up the tablet (obviously it is wiped so you'll lose anything on it from before).

Behold

And it's working! There are some known issues - the camera doesn't work properly, apparently bluetooth is a mixed bag and the rotational sensors also don't work - but these haven't impacted my needs. If you like running your tablet in portrait mode, apparently this can be a pain. However, for me I have a shiny refurbed tablet that plays videos and doesn't keep turning off mid-video. Hurrah!

Overall, this is scary. But it turns out it is also easy. Hopefully others will give it a go and bring their devices back to life.

Return of the Pixel C

Thursday, 14 November 2024

Sending email - redux

It feels like forever since I wrote my last blog post on sending email via a vanity domain but has actually only been a year. In that post, I noted that sending via SendGrid was optional and it should all be doable using Google servers. The SendGrid config has been mostly ok, but hasn't been perfect and I wanted to remove this free third party from my email tool chain so I've revisited the setup and got it working through the Google mail server.

Will this work long term? Hopefully, but I'm not convinced for reasons I've laid out below. Let's do this.

Sending email

First I needed an app password for your Google account, which is a bit of a buried in the security interfaces. You can find the admin console for app passwords here.

This is also reachable by going to Google account settings, under "How you sign in to Google" select "2-Step Verification" and the option for App Passwords is at the bottom of the page.

Next, to configure gmail to send via the Google mail server, I needed to set the outgoing mail, found in:

Settings -> See all settings -> Accounts and import -> Send mail as

Then adding / editing my intended outgoing email address with these details on the second page ("Send emails through your SMTP server"):

SMTP server: smtp.gmail.com
Port: 465
Username: Your google account (blah@gmail.com)
Password: Your app password from earlier
Secured connection using SSL ticked

Email security

This is a minefield and something I'm going to have to monitor to see how horribly I have broken things. First, this tool from Red Sift is great for analysing email security settings.

Deep breath...

SPF

To the DNS record, add:

include:_spf.google.com

and remove references to sendgrid to avoid too many lookups - this flags it as insecure.

DKIM

Without a full Google Workplace account, I can't upload a private key to Gmail so DKIM isn't going to work. Hopefully SPF will be enough. We'll see...

I think this also scuppers MTA-STS, but happy to be corrected.

DMARC

This is tricky. DMARC requires one of DKIM or SPF to pass tests properly in order to pass, then it suggest the receiving server takes a specified action (via the p flag). In this case, my DKIM check is going to fail so that is out. The SPF check passes the initial test however there is a further check to make sure the Sender and From headers are the same. In my case they are not, since Sender is gmail and From is my domain so check fails with a no-alignment error - thus the DMARC check itself fails.

I've "solved" this by setting the p flag in my DMARC DNS entry to "none" which just tells the receiving email server to deliver it anyway. It seems to work for my very limited testing sample, but obviously I'm not happy about this approach.

What is next?

I hope the SPF config will be enough to make my email work happily again, however I'm clearly hitting the limits of the free options in Gmail. If this doesn't work well enough, I think I'll move away from free options and look at something like AmazonSES which (from a quick read) will let me configure everything I need and charge me $0.10 per 1000 outgoing emails. This is probably the ultimate "correct" solution (unless I want to pay for a Google Workspace account) but is a lot more work and right now I don't wanna.

Sunday, 21 April 2024

Hp 1010 printer on Windows 10

I have an ancient HP 1010 laserjet printer, bought back at university some 5 years ago (lol). Eventually I want to replace this with a wifi printer, but only when this one runs out of toner and so far it's refusing to die. Each time I reinstall my computer, I have to figure out how to make it work again so here is a quick post for future me, or for anyone else who is looking to make an HP 1010 LaserJet work on a Window 10 machine.

I run Windows 10 64 bit edition and HP haven't produced a driver since Windows Vista. The printer is so old that Windows 10 doesn't automatically detect it as a printer. To keep it going, I have to jump through a few hoops.

First, download the Vista 64 bit driver.

Extract this somewhere.

Then in Device Manager, do Action -> Add Legacy Hardware. Select "printers" from list and in the port dropdown you'll find a USB printer entry. On the next screen, Have Disk then find the driver you've just extracted. Select the right printer and it should install.

And voila, the printer will now work from the local machine.

Or, if you've got a Linux machine sitting around, it should just work if plugged in (Ubuntu 22 for me).

Monday, 13 November 2023

Sending email in 2023

"Your email keeps going into my junk box" - everyone.

I use a vanity domain to front my email address. I used to run a simple setup where the domain was basically masking my Gmail account. Incoming was handled by a wildcard forward in the domain host. Outgoing, I simply rewrote the email envelope with my desired email address. Essentially I was spoofing the outgoing email.

Gmail used to let me do this, but clamped down years ago requiring proper authentication with an SMTP host however the old setup still worked, as long as I didn't change anything.

Then the big email providers started clamping down on this kind of thing. In an effort to combat spam, email is increasingly complicated and the wider ecosystem is getting more locked down. There is a big rumble about the big providers essentially pushing smaller email providers out by blanket not trusting them, making it increasingly difficult to run your own email setup. This post is not about that, rather it's how I stopped my email started going into junk boxes. I was forging my own sender address, which is exactly the kind of behaviour you see from various types of spam. Nice.

So, on the assumption I wanted my email to arrive I needed to revisit my configuration and set this up properly. I did a bit of work, so I thought I'd write up here so I can repair it in future if needs be, and it's in one place on the offchance it helps anyone else.

Incoming email - you're emailing me

Not many changes here - although I use a combination of Cloudflare and Ionos DNS these days, but a blanket forwarding rule in the Ionos config from the whole domain still works.

Outgoing email - I'm emailing you

Ok, this is where it gets interesting. I can still send email, setting the domain to whatever I want, but my emails are being flagged as spam. This is because the receiving hosts are trying to protect the account owners from spam and my setup was being flagged as spam. Obvious note - I set up a test Gmail account for receiving email so I could test the effects of my settings.

Outgoing SMTP server

First thing was properly configuring an outgoing mail server. In theory, this can be done with the Gmail SMTP service but while I could authenticate properly I found my email still ended up flagged as spam. I'm sure there is a way to do this properly but for the moment I instead turned to SendGrid and this documentation was useful.

A free account allows 100 emails per day - plenty for me. Nobody wants to hear more of me than that. In the SendGrid interface it is easy to create a API key (Settings -> API keys) with appropriate emailing sending permission then when adding the server details, just select smtp.sendgrid.net / apikey / $YourKey. Only slight gotcha is making sure you get the port right (SSL over port 465). This should authenticate properly and email can be sent - although it'll probably be going to junk again.

Next up, setting up DKIM. This stands for DomainKeys Identified Mail - an email authentication method designed which allows the recipient to check that an email came from the domain it claims, and was allowed by the domain owner. The setup is found in Settings -> Sender Authentication. You might be able to get away with Single Sender Verification, but I did the full Domain Authentication. You need to be able to modify your domain's DNS settings for this to work properly.

If the setup doesn't seem to be working properly you can test the individual additions on the command line with a tool like dig.

dig foo8908.tomnatt.com should give a NOERROR response. If it's not, the setting isn't right or it hasn't refreshed yet.

Finally, assuming this is for personal email you'll want to disable link tracking. This rewrites links in your email for marketing purposes and likely break any links you send unless you configure it properly. Turn it off with Settings -> Tracking -> Click tracking -> disable and links will work again.

Other DNS setup

There are two other DNS entries that can help with proving email provenance - SPF and DMARC. I'm not sure whether I needed all these for a minimal setup, but they do work best when all three are present. I did configure them, so I'm capturing what I did. 

SPF (Sender Policy Framework) is another way to ensure the mail server sending an email is allowed to send via this domain. It works by defining which servers can send email, so the client can check, rather than directly encrypting the connection (the DKIM approach). The setup is fairly simple, and can be checked with tools like this.

An SPF policy which allows sending from Gmail and SendGrid servers might look like this:

v=spf1 include:sendgrid.net include:gmail.com ~all

DMARC (Domain-based Message Authentication, Reporting & Conformance) helps receiving mail systems decide what to do with incoming mail that fails validation via SPF or DKIM. So this is worthless without at least one of the other two.

A rule which tells the receiver to mark failing email as spam and send reports to the given email address would look like this:

v=DMARC1;p=quarantine;pct=100;rua=mailto:postmaster@tomnatt.com

Done

And lo, email appears to be flowing again. I hope something here helps. To finish, I want to note that I'm not an email expert - not even close. If you are, and you're seeing somewhere I've written something stupid please reach out and I'll correct and attribute.

Sunday, 13 February 2022

Upgrading to Rails 7

I run some simple Rails applications which I keep upgraded. I recently upgraded Ruby and Rails versions and since it's upgrade season, I'm making a note of my experiences ready for the next application I do, and on the off-chance it can help other people get started. And a reminder that I do do technical things occasionally, honest.

To note - this is a very simple Rails application, so only covers the basic gotchas I experienced. It was an app originally written in Ruby 2 / Rails 5 and in this iteration is now being upgraded from Ruby 2.7 / Rails 6 to Ruby 3 / Rails 7. The code is stored in a repository in Github, with CI done both via Github Actions and Codeship and deployment to Heroku.

Ruby upgrade

Good news! The Ruby upgrade (2.7.2 to 3.0.3) caused no problems at all, although I did need to update my Codeship config to remove the explicit installation of Bundler in my setup script.

Rails upgrade

I made use of the Rails upgrade guide - in particular I bounced the version of Rails in my Gemfile from 6 to 7 then ran bundle exec rails app:update which introduced the usual ton of rubocop violations but also created some migrations acting on some tables which didn't actually exist.

These were ActiveStorage tables so I needed to create them with bundle exec rails active_storage:install then rearrange the migrations to get them to work (ie put the creation migration before the modify migrations). I probably could have eliminated the new migrations since I'm not using this function, but it seems there are other references to these tables. It looks like Rails expects these tables to exist, and the lazy option was to create it and be on the standard path. So I was lazy. Those migration do not include timestamps, so I had to add those to appease the linter.

Second show-stopping problem - Rails 7.0.2.1 was a trap. It turns out there was a bug in ActiveSupport which manifested in a variety of different ways. For me, it stopped almost all automated tests working. It was reported and fixed quickly but did manage to cost me a chunk of time trying to figure out what was going on... Anyway, the simple fix is to use Rails 7.0.2.2 instead.

Now fixing some deprecation warnings. action_cable has been renamed to actioncable and this will escalate to a breaking change in Rails 8 so this needs updating in app/assets/javascripts/cable.js.

Also, I was getting references to using older (Rails 5.1) CSRF protection behaviour. There are a load of defaults which are version locked in config/application.rb and these can be upgraded with config.load_defaults 7.0 as per the upgrade guide.

Locally, this was all that was required however when I deployed to production, the heroku build failed at bundle exec rake assets:precompile. Uglifier needed ES6 syntax enabling, with config.assets.js_compressor = Uglifier.new(harmony: true) in config/environments/production.rb.

And that was it! As I said, a very simple application so I'm sure I avoided much of the upgrade pain but I've noted my experiences here to help others get started.

All these changes are captured in a pair of pull requests:

Sunday, 18 October 2020

Losing Chrome URLs

 This is going to be a short one, mostly so I've got a reference for the future.

It seems Chrome as of v86 (latest at time of writing - at least on Linux) is hiding the full URL unless it is selected, instead showing only the domain. This is to highlight fraudulent websites for people who can tell the difference between www.google.com and www.google.evilsite.com but get confused when there is a huge set of valid-looking path and parameters after it. It seems that's about 60% of the web using population.

Anyway, if you're in the 40% and you find seeing the whole URL quite useful thankyouverymuch and don't want to have to select the bar to see the information, then you can disable this new feature.

Put this into the task bar: 

chrome://flags/#omnibox-ui-hide-steady-state-url-scheme-and-subdomains

Then search for and disable:

omnibox-ui-hide-steady-state-url-path-query-and-ref-on-interaction

Restart Chrome and lo, the URLs are back where they should be.

For me, I was surprised by this and I was wondering why The Internet had decided to embrace loading pages into frames with javascript, before I realise the browser was doing this not the site.

Thursday, 29 August 2019

Fixing Xcode command line tools on an older version of OSX

This will be of interest to nobody but Future Me when it inevitably happens again.

It has been a while since I did anything approaching proper coding and since I use it as a lifeline when things are getting bad, I thought it was time to make something again. The most* fun part of programming is discovering a problem in the development environment and disappearing into a rabbit-hole for days to eventually bring you to the point where you can actually start.

This time, it was vi not working because rvm had triggered a Homebrew update which hadn't worked properly because of an OSX upgrade and ... argh. Ultimately it was Xcode, then the Xcode command line tools being missing.

This is going to come up again, so here's a note for future me.

For boring reasons I do not (and cannot) run the latest version of OSX or the latest version of Xcode. Consequently, running brew update && brew upgrade gave me:
Error: Xcode alone is not sufficient on High Sierra.
Install the Command Line Tools:
  xcode-select --install
That command is not going to work on older versions of OSX. It triggers another process which (I think) hunts for the very latest version of Xcode in the App Store and its tools. I don't have the latest Xcode so it fails to find anything useful.

After quite a bit of hunting I found I can download the exact version of the tools I need from the Apple Developer site.

Once this is downloaded and installed, everything works ok (although I did have some luck also fixing up Homebrew with brew doctor).


*least

Friday, 29 March 2019

HTTPS for a small site - redux

A few years ago I set up LetsEncrypt for my sites, so I could create certificates, do HTTPS and blah blah security. Anyway, it all worked well until, nearly three years later...


Balls

Still, an automated process that has been running unattended for three years suddenly stopping working has never caused a problem, right?

It turns out some things have changed with LetsEncrypt in the last three years. Like, everything. Everything. Even the name. Now the thing I want is called Certbot. Fortunately (and against the trend in modern days) it has improved with time. Now there are packages and guides! Sadly, migration is going to be worse than setting things up in the first place. It's installing new software then making sure it's renewing certs generated in the old way, in the old place.

Sigh, here we go.

So I followed the install section of this guide then ran:
sudo certbot renew
And it ... just worked?! I don't understand. This is not computing.

Ok, I need to fix the cron too. That'll cause problems.

Starting as:
export PATH=<boring path stuff> && /another/path/letsencrypt/letsencrypt-auto renew >> /path/to/logs/renew.log
Change to:
/usr/bin/certbot renew >> /path/to/logs/renew.log
And ... that appears to just work too?!

Amazing. It looks like some things do get better.

Saturday, 26 May 2018

Restoring microphone and sound after Windows 10 upgrade

Warning: this one will get ranty.

At home I run Windows 10 - an operating system I carefully selected and in no way appeared on my computer while I was reading a book. It actually works pretty well for my gaming needs (the only reason it's not Linux) but does have a habit of trying to sell me things or steal all my information.

It also has a habit of dropping massive named updates which do exciting new things like BREAK EVERYTHING.

Recently a huge update landed which I'm going to call the GDPR update. Mostly because I can't be bothered to look up its actual name. When I originally "opted" to install Windows 10 I went through and disabled the inbuilt advertising and random tips on the lock screen because I'm a bit old fashioned and inane nonsense written on screen when I'm logging in just doesn't do it for me. GDPR should only help my desire to avoid advertising - only a truly scummy company would use being forced to confirm my privacy choices as an excuse to turn everything back on and hope I don't notice.

I noticed. You lose.

Special mention for the "send information for diagnosis" option which now lets me choose between "yes, everything and don't forget my passwords" and "only some things". Apparently the older option of "don't send anything" is no longer viable in today's excitingly connected world.

So anyway, I have to choose to not have voice control turned on. No really, really really, please die Cortana. Then maybe my mic wont be on permanently listening to me. It appears it is indeed off. PERMANENTLY. Along with ALL MY SOUND.

Grr, rage, etc. This is revenge for disabling advertising, isn't it?

Anyway, the sound has died before and was a pain to fix both times, so I thought I'd document what I did for the next time this happens. The symptom: output seems silent. On closer inspection there does appear to be sound coming out of the card, however even with the output boosted high it's very tinny and quiet. Many people find problems in their Sound menus (volume being dropped to nothing, device being disabled) but I had a different issue.

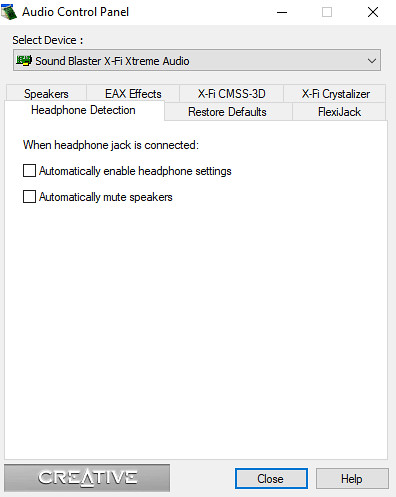
My card is a Soundblaster SomethingOrOther, which has a separate config screen called the Creative Audio Control Panel (which I had to reinstall to get working, incidentally). On this panel there is a Headphone Detection tab, which has options to make the device change behaviour when headphones are connected. This seems to get locked on for me, causing the muting effect.

Voila.
How to disable soundcard mute when headphones are plugged in

I disable the options and it all works perfectly again. I've done this before, however the Windows 10 upgrades sometimes reset these options. Thanks for that. I've experienced this same problem with a Realtek card and the fix was the same - Realtek has a similar control panel.

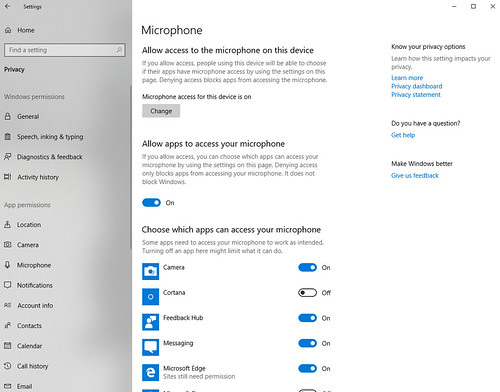
Now for the microphone which is a new and exciting problem. It seems that because I've asked Windows not to let Cortana listen to me all the time, it has interpreted that as "for the sake of my privacy DO NOT ALLOW ANY APPLICATION TO USE MY MICROPHONE". Which is ... extreme.

Anyway, this new option has gone a bit mad and disabled access from everything and sanity needs restoring. The new button is hidden in the Privacy menu, selecting Microphone from the left menu.

Voila. Again.
Windows 10 microphone privacy settings

So things are back to normal. I wonder what will break next? And I wonder if my next ranty post about operating systems will be about how annoying Windows is, or how much I hate OSX? If anyone is placing a bet, I've just had to reinstall Homebrew...

Thursday, 21 December 2017

Hosting a Rails App on Cloud Foundry - first impressions

From time to time I have been known to write a bit of code and whenever one writes a web application, there is always the question of hosting. I've done my time in Ops and I can certainly deploy an application to a VPS and run the surrounding infrastructure to make it work - however, that all sounds like more work than I'm willing to put in. This is the world of Cloud hosting and I'd like to spend my time writing applications, not deployment scripts. What I want is something I can throw code at and have it sort itself out but for my own projects the price needs to be low so I'm not spending a ton of money every month on my own games.

This is an interesting niche as I don't have the same requirements for my own stuff as I would for professional hosting. Initially my requirements were:

  • Very low monthly cost
  • Rails 5
  • Database (probably postgres)
  • Ability to hook it into some kind of CI (ideally Codeship, as I'm already using that)

For my own projects I'm not that bothered about high capacity, or extensive DR. These are great, but are also expensive.

I'm going to end up on Heroku, because the free tier appears to do everything I want and more. However along the way I tried out Cloud Foundry so I thought it worth writing up how I got started.

Easy stuff first


signed up for an account then created an org and a space on the dashboard. I also created a database within the space (no binding - it's better to do that with a manifest). This was all achievable via the web interface. The postgres service has the option of a free database, limited to 20mb storage.

Next, I installed the command line interface and logged in (cf l), choosing the space as the default.

Preparing the application


A Rails 5 application needs no additional configuration, beyond migrating it from sqlite to postgres. The easiest way to tie the application to the production database is via a manifest file. Mine looks like this:

---
applications:
- name: yip-helper
  random-route: true
  memory: 128M
  instances: 1
  path: .
  command: bundle exec rake db:migrate && bundle exec rails s -p $PORT
  services:
    - yip-postgres

The name becomes part of the subdomain on deployment. The memory is kept low to keep the costs down for a personal project. The service listed should match the name of the database created in the space, above. Stick this in the repository so it can be used with the CI later.

Now the application should be ready to deploy with a simple cf push.

Continuous integration


I use Codeship, and their docs worked fine for me with two modifications:

  • I dropped the CF_APPLICATION envar from the script as it's defined in the manifest file
  • My first deploy failed as it couldn't find the required gems - subsequent deploys worked fine, despite a warning about including the .bundle dir in my repo (which I didn't)

Problems


This all works with minimal fuss, however I'm going to end up going back to Heroku. I originally discounted it because it didn't play well with Docker (a requirement I've since abandoned). Also:

  • Heroku encrypts traffic for free on their own domain, whereas Cloud Foundry doesn't have this option. I can pay $20/month to use my own domain and cert but this breaks my first requirement. I can understand them charging for additional domain hosting but honestly, securing their own subdomains should be a given.
  • The Cloud Foundry free tier database is tiny. Paying for a database adds a lot to the monthly costs - this is true of all the hosting options I looked at - so a useful free tier offering is important.
  • Heroku is better supported. In Codeship, for example, there is a plugin to support it whereas Cloud Foundry requires a custom script. It's a simple one, to be fair, but it's symptomatic.
  • The Heroku tooling and web interface are nicer. Again, unsurprising given how much longer Heroku has been around. The Cloud Foundry tools are fine, but the doing the same things with Heroku is just easier.

So there it is. These are just my experiences, based on not a lot of time and with the intention of hosting for a personal project.

Sunday, 9 April 2017

How to Mac - part 2

Well, I'm still making use of a Mac. Four months in I'm starting to get used to the keyboard and some of the oddities (good and bad - I still hate the behaviour of this window management). Time to write some more docs for future-me should I ever have to configure one of these systems again.

Clipboard management


I made the switch to using a clipboard manager years ago and frankly now can't comprehend life without one. I found loads of them on the Mac - mostly expensive and part of much larger packages which I don't need.

The one I settled on is called Flycut. It will only work on text (and will occasionally foul up copying images with a keyboard shortcut) but it works really well for my simple use case and is easily installed via homebrew:

brew cask install Caskroom/cask/flycut

Services


Installing services such as Postgres or Elastic Search via homebrew often writes them into the startup sequence. Sadly, these days I am not coding enough to need these all the time and available RAM is precious so I went looking for an easy way to change what is run when. It seems an easy way to do this is homebrew services, which is easily installed via the homebrew interface and lets me edit the startup sequence and run the services directly without them starting next time I boot the machine. This last command requires a very recent version. Docs on the end of the link, above.

Bash and completion


I took a brief foray into Z shell and found it different enough to bash to irritate me. Given time I think I could configure it to be something I really like, but after some time and rage trying to configure the prompt I decided that I don't have the patience for that at the moment.

The motivator here was improving bash autocompletion - especially for git and homebrew. It turns out the version of bash shipped with OSX is ancient so the first stop was upgrading that via homebrew which then meant changing the bash-completion package (written for bash 3) over to bash-completion2 (which is for bash 4). Next I discovered that both git and homebrew ship with their own completion config which just needed to be parsed when the shell starts.

And thus the fun began.

Homebrew bash autocomplete configuration is hidden in /usr/local/etc/bash_completion.d instead of the more usual /etc/bash_completion.d. I needed to encourage it to parse the contents of this directory instead - which proved surprisingly difficult. In the end I had to add this to ~/.bash_profile:

for bcfile in `brew --prefix`/etc/bash_completion.d/* ; do
  . $bcfile
done

(copied from this Stack Overflow answer because of lazy).

As far as I can tell, bash is supposed to read the contents of the bash_completion.d directory automatically but because homebrew moves it the paths need fixing. There is almost certainly a better way of doing this, but by this point I was bored of this problem and decided to accept something that worked. Then write about it.

I also found I needed to create an empty file at /usr/local/etc/bash_completion because this line was complaining:

[ -f /usr/local/etc/bash_completion ] && . /usr/local/etc/bash_completion

I probably could remove the line, but I had Fear of removing such a standard line of config and ending up breaking something else in the future. Again, probably not the best solution.

And that's it for the moment. Like last time this is mostly my own documentation so I can reproduce these steps in the future written here on the off-chance it is useful to someone else. I certainly don't recommend any of the bash config stuff as the best way of doing things. Think of these notes as a diary, recording my reluctant exploration of MacWorld. End disclaimers...

Wednesday, 21 December 2016

How to Mac

A while ago I made the switch from iOS to Android and now I find myself needing to make a similar transition - this time from Ubuntu to OSX. I've been using Ubuntu for development for around twelve years and like most developers I use a lot of keyboard shortcuts so to say this new world is scary and unfamiliar is more than an understatement. As before I'm writing this for myself in the future if I have to go through this again, and anyone else who has to do this so you know you're not alone.

Getting started


Out of the box nothing was too painful. Sure, the keys are in the wrong place but that is something I'll get used to eventually. I was shown how to put the mouse scroll the correct way up so that helped with moving around (it's in System Preferences -> Trackpad) and since to start with life was all about Chrome and simple text editing it didn't hurt too much. Except for the loss of function keys and the missing delete key (fn+backspace). Sigh. Still, the hardware is genuinely lovely and I'm very impressed with the battery life. As I type this I've been working all day from the battery and I'm still seeing 41% charge. Now; my Linux laptop has seen some serious miles but I don't remember it ever doing this well. Plus it's really nice having the operating system work 100% including hibernating, sleeping and all the other bits and pieces. That has been getting much better on Linux over the years but if I'm honest it's just nowhere near as good as I'm seeing here.

First shot at some real work


So then I had to start installing tools and getting things set up for actual web development. First up, Chrome. Gone are the days of hitting F12 to bring in the developer tools or a two button shortcut to view page source. Now I have to some weird contortion exercise for the tools and I have to include the command key to view source. Maybe it gets lonely and sad if it isn't pressed often enough? Anyway, my brain will remap this eventually so it's not the end of the world. 

Bring forth the command line


At the suggestion of literally everyone I immediately abandoned the default terminal in favour of installing iTerm2. That involved installing a package manager and a plugin for the package manager. This is weird territory for someone who is used to apt being an integral part of the operating system, but I was still impressed by the screen and battery life so I rode that happy wave a bit longer. First I needed some other odds and ends and eventually a friendly Mac user at work gave me some commands and I typed them in and Things Started Working (because when did just typing in commands blindly ever hurt?). I'm impressed with his wizardly powers, but I'm well aware that one day I'll need to do this again and I may be in serious trouble.

Command history suggests "we" did something like:
  1. install xcode to get gcc
  2. install homebrew: /usr/bin/ruby -e "$(curl -fsSL https://raw.githubusercontent.com/Homebrew/install/master/install)"
  3. install cask: brew tap caskroom/homebrew-cask
  4. install iterm2: brew install iterm2
Well, if my memory has failed me it's a problem for future me. In the meantime I have a package manager and now an exciting terminal which is all the wrong colours, but that's hardly the Mac's fault. A few tweaks and I'll be up and ... wait, why is the window split in half? 

What do the buttons do?


The terminal is where the keyboard shortcuts really started to hurt. A combination of some of the shortcuts being different, an entirely new modifier key to contend with and my brain attempting to use CMD instead of CTRL except now apparently not all the time produced many, many frustrating mistypes and resulted in a couple of hours rebinding keys. It's now better - not as good as the default terminal in Ubuntu, but very usable and at least iTerm2 lets me save my profile for future use so I don't have to go through that again. 

I also discovered that OSX uses slightly different environment files to Ubuntu so I had to source my bashrc file from bash_profile to get that read properly. Apparently age-old Mac users keep build scripts so a new machine is just configured for them while they make tea. 

At least git works, right?


Yup - no problems here. Well, until I attempted tab completion at which point I was told that I actually needed to install something to make it work, which in turn needed me to reinstall git via homebrew.

Sigh.
  1. brew install git
  2. brew install bash-completion
  3. git config --global push.default simple
That last is, of course, not a Mac specific requirement and shouldn't be needed since git 2.0 but I don't trust default behaviour since Code Vanished back in my last place of work and mild panic ensued. If you don't know what it does you should probably be doing it.

Installing SublimeText 3


I had already realised I wasn't going to be able to directly copy my old Sublime config to this machine as I had a whole new button to work around. Still, I assumed installation would be straightforward then I could spend some time remapping keys until I was more or less happy. I also wanted to be able to use the subl command on the command line to open files like in the old days, but this was proving difficult so I had to call in help (from a different helpful Mac user as I was already feeling like a moron at this stage). The look of horror he gave me when he saw how I was running Sublime told me I had done something wrong. Again.

It turns out that running a downloaded dmg file runs from a mounted volume. I needed to drag my running application to the Applications option in the file browser and then the Mac did some more exciting magic things and everything was fine. Right, not going to forget that one in a hurry.

Where are my windows?


One of the other things I really miss from Ubuntu-land is the way it handles multiple desktops. Maximising a window in OSX puts it into a full screen mode which moves it to its own desktop and makes it difficult to move around if you're used to ALT CMD+Tabbing around. There is a way around this - it turns out that if you hold ALT and click the maximise button you get the old "make big" behaviour and ALT+Green toggles back again.

If you want a keyboard shortcut (and you do) you need to install Spectacle (brew cask install spectacle) then you can maximise (not fullscreen) with CMD+ALT+f. To go back to normal size you can use CMD+ALT+z (thanks to yet another friendly Mac user for that one).

Fortunately, the CMD+` shortcut to move between windows of the same type still works, although harder to use with the § ` key moving to pastures new.

Is it working now?


I think so - or at least it nearly. RVM installation didn't bring up any nasty surprises and seems to be working perfectly. On the other hand, Finder is extremely odd. If, like me, you're used to moving around files with the arrow keys then hitting enter to open them, you might be surprised to discover that enter in fact lets you rename the selected file. If, like me, you then go hunting for the alternate shortcut you may struggle to find it unless (unlike me) you think to try CMD+Down which for some reason will do what you want. I had to ask. Now you don't have to.

These are the reports of my adventures so far. I may do a follow-up when I have to do battle with virtualisation if it proves tricksy (which is likely because, to be fair, it's hardly trivial on any platform) or if anything else thrilling comes up. After quite a few hours playing with this system I'm in a position where it is doing a fair impression of vanilla Linux. Albeit with the keys in the wrong places.

I hope this helps someone. Happy Christmas.

Edit: behold Part 2.

Thursday, 31 March 2016

And lo, I have Windows 10

I’ve been meaning to upgrade my gaming PC to Windows 10 for some time but it didn’t manage to be the most important thing on my todo list at any point. Partly this was fear of the unknown - I knew Win10 was going to be a shift in UX and also thought it likely to break at least one peripheral. My attitude to an operating system is that it should do its job quietly and not get in the way and, frankly, I didn’t feel inclined to invest time in adoption pains. That’s time I can spend more profitably sleeping or looking out of the window.
Microsoft, it seems, had other ideas. They pushed the Win10 upgrade through their patch management system and I fell victim to the auto-upgrade problem. It’s a dark, stormy night. The wind is shaking the windows, drowning out the drumming of the rain. I’m sitting in a partly lit room, curled up comfortably and reading something on my tablet. In the corner, my computer is on, untouched for the past hour. I glance up and a chill runs through me. On my monitor is the ominous message “75% upgraded”.
I could write extensively about the aggressive way Microsoft have pushed Win10. I could complain at length about it arriving on my computer unwanted and the abuse of trust around using a security patch mechanism to automatically install a complete operating system without my input. I could compare the techniques used in release of this system to the way malware is spread. But others have done all that. Instead, I’ll focus on my experiences now it has arrived.
It’s fine.
Sorry, that was really dull but honestly it sums it up. The installation process was really simple. I had to track down and turn off the P2P patch sharing stuff (uncharitable, but I wasn’t in the best mood at this point) and some of the information sharing stuff (Win10 is horribly intrusive) but otherwise it just loaded up as New Windows with no real fuss.
The next evening I sat down to see what had really happened behind the scenes. First step was going through the security and privacy options. The defaults here were horrible (everything seems to have access to everything, including cameras and microphones) but the menus themselves were clear and it was easy to turn it all off. I also came across some advertising options - it seems in the brave new world of Windows it’s a good idea to have (targeted) advertising on your lock screen. Fortunately, both the targeting and the advertising can be disabled (separately) and so that went too. The start menu was a mess, but simple enough to remove the new and exciting rubbish and simplify back to the applications I’m actually going to use.
Next up, there is Cortana. I like the idea of Cortana and I quite fancied playing around with her. Unfortunately, in order to be helpful she looks at everything you do and sends it all off to Microsoft HQ so they can tune her electronic brain. So she had to die. Killing her off was actually harder than it needed to be - stopping her talking to Microsoft wasn’t too hard, but that left her zombified husk on my task bar and I had to work out how to purge her from there too.
Having finished with my electronic holy water, I moved on to my own customisations. I found that Steam, Chrome and Office all worked fine which is the majority of my use of that computer immediately. Also, my automatic backups (I use Macrium) continued to work and mapped drives were still mapped.
So far, so painless. I hadn’t needed to reconfigure anything and the new interface hadn’t caused me any real suffering. Time to check the two things I feared would break - the main reasons for putting off the upgrade in the first place. My joystick and my game recording setup.
First off, the joystick. My basic fear was that the (already shoddy) performance of the drivers would be even worse under a more modern operating system. My fears were confirmed when it failed to load properly. To Google! Fortunately, I wasn’t the only person looking for help (this thread was very useful) and - much to my surprise - Mad Catz had released some beta drivers for Windows 10. The Win7 drivers were released in 2011, whereas the Win10 drivers came from August 2015. And they worked. Probably better than the older drivers (I didn’t, for example, suffer any blue screens while installing them). I’d lost some of my settings, but that was easy to replicate and it was fine.
I did notice a problem on boot. Win10 boots faster than the USB devices which caused problems with my stick. This was easily fixed by disabling Fast Boot. It didn’t seem like the best solution, but it worked.
Next up, game recording. Astonishingly, this also Just Worked. Mostly. I had to re-enable some of the output devices in the sound menus, but I got everything going just by double-checking the everything in my original post.
Windows 10 is fast, stable, not overly ugly, and very easy to install. It’s a change to the user interface, but not one that particularly gets in the way of just using the computer. It’s a pig for privacy, but you can turn all that nonsense off. So, overall a surprisingly good experience. 9/10. Would have my computer hijacked and a new OS forcibly installed again.

Sunday, 28 February 2016

Into space with the Saitek X52 Pro

Since Christmas I have been playing a lot of Elite Dangerous. It’s a great way to spend time - floating around in space, deciding what to do with an evening, heading off to achieve things and gradually increasing in rank and skill.

I cut my teeth (whatever that means) playing on a keyboard and mouse setup, which is … functional. At best. Online People say that a HOTAS setup changes the way the game plays entirely and is a must for any serious Elite player so I thought I’d give that a go.

After much deliberation (should I spend £270 on a replica of the flight controls from an A10?) I decided to go for the Saitek X52 Pro. It was, apparently, the stick used by Frontier Developments when designing Elite so should have good in-game support. There is a strong body of opinion that it is better than the newer stick, the X55, in terms of button placement and general feel (and saves £50 too). Plus it looks exactly like the joystick your avatar is using in the cockpit of your ship.

The good

  • the hardware is lovely - solidly built and satisfyingly weighty
  • ergonomic stick, adjustable and comfortable
  • button placement is equally good with most functions falling naturally under my fingers
  • I keep finding buttons - after a month of using it I suddenly discovered a small wheel on the throttle I hadn’t noticed before

The bad

  • the drivers are horrible - I mean really horrible
    • it took several attempts and a few blue screens to install
    • I have to plug the joystick in to the SAME USB port - I’m not quite sure how they’ve achieved that
  • the control software is horrible, although less than the drivers
    • saving the profile doesn’t seem to work properly
    • I have to manually tell it to load a particular profile before playing
    • in Elite some buttons can only be mapped after changing the default bindings in the profile
    • for some reason I seem to need the control software actually open to make some of the remapping work in-game
This is running the latest official Saitek / Mad Catz drivers on a Windows 7 machine.

So, did it change my life?

Well, kinda. It really has made a difference in game. I can perform manoeuvres that were next to impossible with the keyboard / mouse combo. More importantly, the feel of the game is indeed very different. The joystick and throttle really help with the immersion and even routine activities are a lot more fun.

On the other hand, the driver problems really tarnish the experience. I would struggle to recommend a Saitek device to others - especially since I’ve apparently got away lightly (the control software rarely crashes for me and my system remains stable). None of these problems are insurmountable but, basically, I expect a lot more from a piece of hardware costing in excess of £100.

I’m happy with where I am now, but it was far more work than I wanted to go through for a premium peripheral. If I decide to buy a new stick in the future I will be reading about the software support very very carefully before selecting my product and it will take a lot to convince me to buy anything with software by Mad Catz again. It’s a shame because the hardware is really very nice.

Saturday, 19 April 2014

On a list

Recent statistics from Steam say that approximately a third of owned games remain unplayed. I'm as bad as anyone with this - between sales, Humble Bundles and people sending me keys from THEIR bundles I've got a long list of the things I'm sure I'll get around to playing one day. Obviously, when someone says "Hey, Splinter Cell: Blacklist is on sale - why don't we pick it up?" there is only one response: why not?

I've got a splinter

I'm not a long-term fan of the Splinter Cell series. Slightly odd national-paranoia storyline and slow slide into mediocre FPS territory aside, I've never really gotten into the gameplay. This is probably my own fault as typically I've played the games around five years after release and they really haven't stood up to the ravages of time. It's not that I dislike the games - it's more that each time I've sat down to play one I've found better things to do with my time. This time, though, there was something different. Blacklist has co-op.

Just the two of us

Things are better with a friend and gaming is (usually) no exception. Assuming you have a friend to play with, co-op can be seen as a magic bullet that can improve any game. Of course if you have to find someone via a matchmaking system it can be the most irritating thing in the world.

Personally, I like to be able to play whatever the game has as a single player campaign in co-op mode. Blacklist goes down the cheap and annoying route of having a single player campaign with some bonus missions in which you can bring a friend. Normally this leaves co-op as a bolt-on to be enjoyed for half an hour before you move on to the inevitable multiplayer. Blacklist manages to avoid short-changing you by making the bonus missions roughly 75% of the game content and this means many happy hours yelling at your buddy for tripping alarms and forcing a restart of the entire mission. It really is a lot of fun and substantial - which is good, because it was the main reason I bought the game in the first place.

I'm told the side missions are divided into four types which will be recognisable to fans of the older games. I can't comment on how good these missions are at evoking the spirit of the older games, but I can say that they all play differently and are a good way of keeping the game fresh and interesting. There are the "normal" missions, with normal defined as being similar in playstyle to the single player game. Then there are the full-stealth missions where the whole thing is failed if anyone catches sight of you. These are great as the tension ramps up towards the end and you risk losing the last hour of game time to a mistimed run from cover to cover. Next up there are the violent missions in which your job is to murder everyone in an area - ideally without being seen - which are a pleasant change in pace to the uber-stealth missions. Finally there are the survival missions, in which you need to hold an area using guns and gadgets until you've worked through the waves of attackers then either bail or stick around for more mayhem.

I've not seen co-op implemented quite like this before. It's a fantastic idea, giving me the co-op experience I like while leaving the main campaign alone so the writers can tell the story they want to tell without being hamstrung by the constant requirement of a second protagonist.

All by myself

So yes, there's also a solo campaign. It seems to do a good job of continuing the existing story while not alienating newcomers to the series like me. I found it easy enough to get a feel for the established characters - not the most challenging thing, but they are more rounded than most of hardened military or espionage types you typically find in settings like this.

The plot deals with a massive terrorist operation on US soil. It's heavy on the argh-foreigners paranoia, but interestingly you'll spend much of your time crossing swords with other US intelligence agencies and doing some pretty dubious stuff to get around them. It's a little odd to see a turf war breaking out while tens of thousands of civilians are at risk but it's credible and it makes for some interesting caveats on some of the missions. Nothing says "be careful" like the game failing you the moment you cut down an unsuspecting friendly trooper with a hail of silenced machine gun fire because you were too ham-fisted to sneak across a compound without them seeing you.

I also appreciate the game letting me do these things myself. It's depressingly common that a game's story is told through non-interactive cutscenes or via quick time events (note - a non-interactive cutscene does not become gameplay just because I have to lunge for a random button on my keyboard 3 minutes in) but in Blacklist the game does not feel in the way of the film the writers want you to watch. You get short cutscenes before and after missions and everything else is told in-mission. Like the extra work which has gone into making the co-op mission structure, this makes a big difference to the game.

Except...

Oh yes, except the end (bit of a spoiler warning for some of the game's ending here).

I assume there must be a QTE guy somewhere involved in this project. Maybe they sent him out for coffee every day so he couldn't interfere. Maybe he was on holiday. Either way, they managed to distract him for most of the game's production. Then at the last minute he was allowed back in and the FINALLY BOSS is defeated by a series of bloody quick time events - and not just ordinary events either. They are obnoxiously difficult and cause you to restart the entire boss fight (the rest of which is oddly mechanical and doesn't really flow properly but at least is gameplay) when you inevitably mess them up because after 20-odd hours of a proper game you really aren't expecting them.

ARGH.

I don't normally have a problem with QTEs (passing them, that is, not appreciating them) but the only way I could get through these was to learn the sequence and anticipate which button to hit. Thanks guys. It certainly doesn't ruin the game, but it does have a good go at ruining the ending.

Always a system

Back to something positive. The upgrade system is extensive but because of the variance in the game types in the extra content most of what is on offer is actually useful. The problem I had with something like Dishonored is that it gave you a big pile of toys with which you could cause mayhem then slapped your hands if you actually used them. In this you get everything from knockout gas to land mines and then the game lets you get on with it. Obviously you can't use hand grenades in the stealth-only missions, but you can go nuts in the survival modes. The guns aren't quite as generous as the gadgets - the silenced weapons are definitely more useful in all modes - but you can still find a use for the assault rifles if you try.

The only exceptions are the breaching charges (I carried these through SO MANY MISSIONS because they sound cool and didn't manage to use one once) and the final goggles (which appear to be the same as the second to last goggle but with a stylish chinstrap). Bonus points are awarded for not ruining the upgrade system with the DLC kit. Although it is very good there are still normal unlocks which are better so there is still something to work towards.

All the people

There's also a competitive multiplayer mode. It's another interesting Ubisoft game, with unbalanced teams fighting very different battles, and works very well. I haven't found it compelling enough to play for hours but what I did play was a lot of fun.

And so

I like Blacklist. I'm genuinely surprised to be writing that. In fact, I like it a lot and I'm sad that I've now played through all the content. I'd like a little more co-op, but frankly I'm always going to say that and despite completing it I can see myself going back to play more of the survival games. I hope the sequel is structured in the same way - if I can get another fix of sneaky co-op fun then you can finally me to the list of people who are excited by this series.

Saturday, 1 February 2014

A city in Crysis

Oh look – I’ve got a blog. Seems I managed to forget that for most of last year. New Year’s resolution: write more. Let’s see how that turns out.

Games!

Back in the old days this was a blog about video games. I played through and wrote about Crysis and Crysis: Warhead and made certain criticisms of the design decisions. In my post about Crysis I praised the game but said the narrative was a bit wonky, lurching from shooting Koreans to shooting aliens and in the process utterly changing the way the game played – and not for the better. They fixed that in Crysis: Warhead. I also said that the nanosuit, while being interesting was overly complicated and that they’d be better off losing some of the power modes and having them always-on.

Which brings us nicely to Crysis 2.

Suit me up

We’re back in the nanosuit – now apparently only being worn by one person in the entire gameworld – but with some of the power modes removed and those functions always-on. Sounds familiar. The new interface is far slicker than the old one which makes the gameplay faster and more fluid. The missing modes (Speed and Strength) are still around, but accessed via context-sensitive prompts (Strength) and just running quickly (Speed) which makes a lot more sense, even if you’re sometimes killed by enemies because being shot has drained your energy leaving you unable to run away properly. Still – it’s your fault. Plan properly next time.

Me suit up 

But you can’t just remove the useless element from an interface - you have to add new and exciting buttons to push to justify the “2”ness of the experience. So we have nightvision, which I don’t remember in the original games and not really worth the bother now. It is only of any use in one (very brief) section where the lights fail and a couple of occasions when the playing area is randomly filled with smoke. It just feels tacked on, which is a shame.

Then there is TacVisorThing. I struggle with TacVisorThing. I like game worlds and generally I feel it helps immersion to build logical gadgets then incorporate them into the gameplay rather than adding something cool and hoping the setting can swallow it. In the gameworld, the TacVisor makes sense. Basically, you bring down the “spotter” sights and the nanosuit analyses the battlefield and overlays tactical options to help you out. Generally they are quite obvious (marking high ground as suitable for "sniping" or the bit at the side suitable for "flanking") but it can point out weapon and ammo caches which would otherwise be easily missed. The problem is that all this really does is put a series of button presses between you and continuing the action when you enter one of the more open areas. It’s just busywork and I can’t help feeling that an automatic overlay would have been a nicer solution (prediction for Crysis 3! Which has been out for nearly a year!).

Oh, and there is an upgrade system too. More on that later.

Up me suit

So, we’re suited up. Time to get going. The gameplay drops Crysis’s vaguely open world for a series of corridors spilling out into arenas. It keeps things focused, but does lose any real sense of planning. You’re going in at A and coming out at B. All you can really decide is how to progress between those points. Oh – you’ve chosen stealth. Well, that means you can just walk from A to B and ignore the guys hanging around waiting to kill you.

Damn.

Yes, the Stealth option basically lets you bypass most of the enemies and without ever engaging them. And there really isn’t much encouraging you to fight – sure the human opposition are portrayed as a bunch of thuggish tools, but you’ve got places to be and pretty soon they are all busy being eaten by aliens anyway. The aliens on the other hand are big walking robot things with tentacles coming out of their heads (gone are the flying squid-things from the first game) who … you can also walk straight past. Sigh.

Actually, this feels like a step backwards from Crysis 1 where the enemies would hunt you down once you’d shown yourself. Now re-cloaking utterly confuses them. They don’t try shooting where you might be, or throw things to make you appear. You can just scurry off and murder anew from a new angle. The AI in general seems universally dense – they follow very obvious paths and just don’t seem to react to what you’re doing beyond “turn and shoot” instincts.

In an effort to stop you bypassing all the enemies in stealth mode there is an upgrade system which is powered from the corpses of the alien troops. There is some pseudo-science explaining this, but suffice to say that it means you’ll 1. spend a lot of time running like an idiot through the middle of firefights because you don’t want to lose the XP, rather ruining game flow (why can’t the pick-ups drift to you?) and 2. become next to invulnerable horribly quickly. Pro tip when upgrading – get level 1 of all 4 sections, then save for level 3 stealth and armour in that order. Everything else is largely worthless.

There are also token collectables which do little other than say YOU’RE PLAYING A COMPUTER GAME (why am I picking up tourist models of famous buildings, exactly?). It’s important to not forget those.

Tell me a tale

The plot? Yeah, there's one of those too.

Come on

Eugh. Well, there is some evil-PMC nonsense, an alien invasion, a sinister businessman pulling the strings behind the scenes and some of the noblest marines you’ll ever meet. The characters are largely uninteresting and to a man unlikable and most of the time you’re glad you’re on your own. The marines do provide a particularly hilarious sequence though – you’re told that the normal humans basically have no chance against the aliens and you need to escort them back to base. However, these normal humans turn out to be invulnerable (presumably to stop the escort quest making you hate all of humanity which is what normally happens – definitely a good decision) which means you can cheerfully use them as shields or just cower in a corner while they PUNCH THE ALIEN MECHA-SUITS TO DEATH. Do NOT mess with the US Marine Corps.

You’re still typing

That’s about it. It all functions, but it feels rather uninspired. It’s as if Crytek have built a great engine, hired the best artists on the planet (even seven years on it looks amazing, but then you already knew that), thought about the nanosuit and basically free-styled the actual game part. Not to say that it isn’t fun – I had an enjoyable 10 or so hours blasting through it, aside from a horrible end of game fight against cloaked aliens who had to die to unlock a door for … reasons – but it feels like a missed opportunity. There was the potential to do an open-world game in a semi-ruined cityscape here which changed as the war evolved. Who knows – maybe some of your actions could have helped that evolution along different paths. In that world the nanosuit could have come into its own, allowing you to customise the game to your preferred play-style via your use of powers and upgrades. Instead, we have a corridor shooter with some knobs on. A good corridor shooter, with some very pretty knobs but still – corridors and knobs.

Friday, 31 May 2013

An FPS but a bit more

I find the mechanics of Republic Commando interesting. On the face of it, it's a basic FPS which uses the Unreal 2 engine. You can carry 5 weapons plus melee attack and you fight waves of droids and flying bugs. Underneath that, however, it is something a bit different.

At the heart of what makes Commando different is the squad combat mechanic. Instead of the usual lone commando setup, you are one of four and you can give your AI buddies orders to help out. So far, so unremarkable (although at the time perhaps not - I can't recall offhand when squad control started becoming a regular thing). The really nice part is the way the squad control mechanics are worked into the game.

Firstly, it is not a gimmick - rather it is a tool that is incredibly useful to progress. In a game such as Mass Effect 2 you can quite happily ignore your squad and they will do their own thing while you blast your way through the encounters, however attempting to do this in Commando this will likely result in a quick and messy death. On several occasions during my playthrough I blundered into a firefight and had my team slaughtered however on restarting the section, playing thoughtfully and actually using the options available to me the exact same encounter became a breeze. This isn't because your mates are victims of stupid and in dire need of micromanagement (the AI of your team is well above average in fact) but because there is a very tangible benefit to using the squad order system and instructing them to switch to sniper mode or hold a section of cover or whatever. Having said that, the order system does remain a tool. You are rarely forced to command your fellows and you can, if you're feeling light on your feet, play Commando as a more traditional shooter. Importantly, there are also some really bad command options presented so mechanically issuing orders doesn't work which avoids the danger of it becoming a simple "I win" option.

So the issuing of orders is a noticeably useful option given to the player. However it doesn't feel like a mechanic to be exploited because of the second great thing about its implementation - it is part of the game world. The obvious point there is that your character is the squad leader so you are expected to be telling everyone what to do. More subtly is the way the game encourages you to think carefully about your options. In any decent sized firefight there will be a dozen positions your squad can take up so you need to not only use the mechanic but think in real terms about the way this will benefit you. Most of the time it's fairly obvious stuff - but only if you're thinking about covering fire, line of sight and so on and then you're thinking about real world options rather than clicking buttons which helps with the immersion.

Something else important about the design of the squad is the commando skillset. Although each one of your team mates has a distinct personality, in terms of ability they are entirely interchangeable. While that may sound simplistic it helps avoid making everything too obvious. You don't drop your sniper in the sniper spot simply because he's a sniper, for example. You can have intersecting fields of sniper fire if you want - you aren't restricted to just one guy with a rifle. You also don't have the problem of needing to blow something up and your demo guy is the one who decided to get his face shot off - someone else can step up to the task.

Linked to this is the way you can define your own role in the team. You have the same skills as your team mates which means every time you order someone to set a bomb or hack a terminal, you can do it instead if you prefer. In the middle of a firefight, you can order one of your chaps to get on with hacking while you shoot the enemies off him, however if you prefer you can instead put yourself in danger and order your team to give you covering fire. It may not sound like much, but this really makes you feel like part of a team instead of above it which does wonders for the oh-so-important immersion.

There are other clever design ideas - regenerating shields but collectible health so you can barely survive a firefight and limp into the next bit without being completely crippled springs to mind - however the squad control system is what makes Commando interesting. It manages not only to avoid being a gimmick, but also demonstrate how a cleverly applied gameplay mechanic can enhance atmosphere and immersion.

Saturday, 18 May 2013

Defending the Republic

I've been playing Star Wars: Republic Commando because sometimes you need to step back in to the past to remember a time when games weren't all about DRM arguments and chest high walls.

Before moving on, though, I have a confession to make: I am a huge Star Wars fan. Not the new Clone Wars nonsense, but the older stuff made before Lucas went completely mad and (particularly) the Expanded Universe. For those who haven't read any Star Wars novels, the EU is the place where (mostly) talented sci-fi authors were allowed to play in George Lucas's beautiful sand pit and contribute to a (mostly) curated timeline which spanned thousands of years of Republic history. The stories explored different aspects of the central characters of the original films, but also expanded on the lives of pretty much every being shown in the films and added hundreds more besides. It's in this tapestry of supporting characters that Star Wars really shines - the Jedi may be the knights errant of the universe, but there are a tiny number of them. The other characters bring them to life.

For anyone reading this in the future, this is why Star Wars used to be great before the Clone Wars retconned a ton of stuff and Disney made some new movies which undid the rest (these movies don't exist at the time of writing - my crystal ball is not optimistic).


Republic Commando, then. It's a game which focuses on the clone commandos of the Republic (no, really) in a series of engagements during the Clone Wars. It spawned a series of excellent novels by Karen Traviss and contains no lightsabers or Force powers. In fact, a Jedi only shows up once in a cut scene and he just gives some orders and leaves again. It really is very good.

Firstly, the game feels like Star Wars. The blasters make the proper noises, the vehicles move around ponderously, the architecture looks right and the music is spot on. Secondly, and more importantly, the central characters are plausible. The commandos do joke and banter while moving around but they are focused on the task at hand. Throughout, there is a sense that the plot is moving on because the main characters are driving it onwards through their ability to complete missions, rather than hanging on while events unfold around them.

Mechanically, the game is a fairly basic FPS with some squad mechanics built into it. The squad controls are very well streamlined and well worked into gameplay. Successfully commanding your troops makes a huge difference to the frantic firefights and there are just enough options to leave you feeling in  control, without becoming needlessly detailed and fiddly. The AI is pretty good too - you generally feel part of the squad, rather than the leader of a band of special needs troopers. Your team will heal themselves, pick each other up, take intelligent firing positions and sometimes even take point when exploring - and this is before you start giving them orders. It means you can often choose your role in an encounter. Want to stand back and shoot Separatists whilst your team go and set explosives? No problem. Want to set up a sniper crossfire while you run around in the open hacking terminals and taking fire? You can do that too, and your team mates will actually shoot enemies off you.

There are problems too, of course. The AI is good, but not great. There are moments when they run off the wrong way or melee the super battle droid you want to grenade. The contextual squad controls can sometimes be annoyingly fiddly to target. You non-squad allies are, to a man, completely useless and will usually catch a blaster bolt within a moment of appearing and some of the badguys are horribly unfair as they flit around, dodging your gunfire. All of these problems are ignorable because it's so Star Wars which, after sitting through Clone Wars cartoons and that horrible cgi film is so very nice.

Tuesday, 23 October 2012

Quantal Quetzal - second impressions

Printing has broken. Sigh.

This is actually a cups issue, not an Ubuntu one - Ubuntu has simply included the latest version of cups in its repositories. Sadly, cups 1.6 removes the network discovery feature so if you're using it, your printer list post-upgrade will look rather barren.

There are an assortment of bugs opened about this issue. Here's hoping someone forks or patches the project.